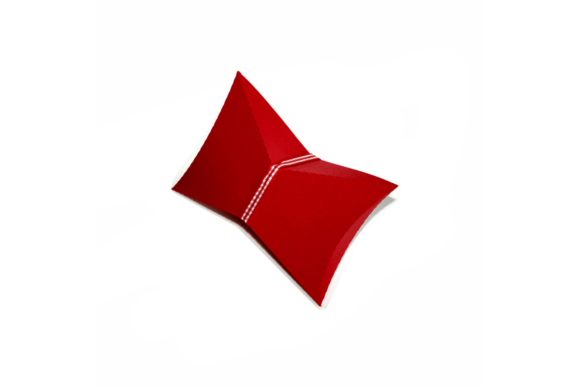
The Art of Assembly: Mastering the 3D Bow Tie Shaped Party Favor Paper Box
In the world of event planning, crafting, and small business gifting, presentation is often just as important as the product itself. While high-end packaging solutions exist for large-scale commercial needs, there is a distinct charm in custom, hand-assembled packaging that adds a personal touch to any occasion. One such standout design is the 3D Bow Tie Shaped Party Favor Paper Box. This unique container not only serves a functional purpose but also acts as a decorative element in its own right, transforming simple treats or trinkets into memorable gifts.
What makes this specific box design particularly appealing to hobbyists, educators, and DIY enthusiasts is its versatility and ease of construction. Unlike complex origami structures that require years of practice to master, this box is designed with user-friendly features that allow anyone to create professional-looking results. In this guide, we will explore the significance of these boxes, how they fit into modern creative practices, and provide a clear, step-by-step breakdown of how to assemble them from a single flat piece into a stunning three-dimensional shape.
Understanding the Design Philosophy
At first glance, the bow tie shape may seem intricate, but it is rooted in efficient geometric design. The beauty of this particular paper box lies in its construction method: it comes as one piece cut. This means there are no separate components to glue together prematurely, no complex interlocking flaps that might confuse a beginner, and no need for external adhesives during the initial shaping phase. Instead, the design relies on precise scoring and perforation lines that guide the assembly process.
This "one-piece" philosophy is significant for several reasons. First, it reduces waste. Since everything is derived from a single sheet, you can maximize material usage by arranging multiple designs close together on a larger sheet of cardstock or paper. Second, it offers immense flexibility. Because the design is scalable, you have the freedom to re-size and cut the design in any size you wish. Whether you are looking to create miniature favor boxes for wedding candy or larger containers for party goody bags, the structural integrity remains consistent regardless of the scale.
Why Choose a Bow Tie Shape?
While square and cylindrical boxes are common, the bow tie shape offers a distinctive silhouette that catches the eye. It breaks away from the monotony of standard rectangular packaging, adding an element of surprise and elegance. For businesses, this uniqueness can enhance brand perception; for parents organizing birthday parties, it adds a playful yet sophisticated vibe. Furthermore, the asymmetrical nature of the bow tie allows for interesting visual arrangements when displayed in groups, creating dynamic patterns on tables or shelves.
Preparation and Customization
Before diving into the assembly, it is crucial to prepare your materials correctly. The success of your project depends largely on the quality of the paper or cardstock you choose. Heavier cardstock (such as 80lb to 110lb) will result in a sturdier box that holds its shape better, especially if filled with heavier items like chocolates or small toys. Lighter paper may be suitable for very small favors but might collapse under weight.
Scaling the Design:
If you are working with a digital template, you can adjust the dimensions before printing. However, if you are cutting from a pre-printed sheet or a physical pattern, remember that precision is key. When re-sizing manually, ensure that the ratio of the sides to the tabs remains constant. If the tabs become too small relative to the box body, gluing may become difficult. Conversely, if they are too large, the final box may look bulky. A good rule of thumb is to maintain a tab width of at least 0.5 inches (1.27 cm) for easy handling.
Step-by-Step Assembly Guide
Once you have your material cut to size, the assembly process begins. This part of the journey is where creativity meets engineering. The instructions provided for this specific design are straightforward, relying on fold lines rather than complex manipulation. Follow these steps carefully to achieve a perfect finish.
Step 1: Pre-Folding Along Perforated Lines
The foundation of a crisp, professional-looking box is proper scoring. Look for the perforated lines on your cut-out design. These lines indicate where the paper needs to bend. Using a bone folder, a dull butter knife, or simply your fingernail, gently score along these lines. This creates a weak point in the fibers of the paper, ensuring that when you fold, the crease is sharp and clean rather than ragged or uneven. Take your time here; rushing this step can lead to misalignment later.
Step 2: Securing the Sides
With the folds established, it is time to form the basic structure. Identify the side tabs—these are the small flaps extending from the main body of the box. Fold the side tab inward towards the center. You will see corresponding edges on the opposite side where this tab needs to attach. Apply a thin layer of glue to the tab and press it firmly against the designated end. Repeat this process for all side tabs until the sides are secured. At this stage, the box should begin to take on its three-dimensional form, though it will still be open at the top and bottom.
Step 3: Forming the Bottom
Now, focus on the base of the box. To close the bottom, you need to manipulate the bottom flaps. Open the box by squeezing the sides slightly. This action helps to flatten the bottom area, making it easier to work with. Next, press the bottom downward along the perforated lines. You will notice that the bottom consists of two main sections that fold inward. Press down firmly to create a flat base. Once one side is folded, repeat the process with the other bottom side, ensuring that the flaps overlap neatly and lie flat. This creates a sturdy floor for your favor box.
Step 4: Closing the Top
The top of the bow tie box requires a similar technique but in reverse. Again, apply the same process to the top. Squeeze the sides to open the structure slightly, then press the top flaps downward along their respective perforated lines. As you press down, the characteristic bow tie knot shape will emerge. The tension from the glued sides and the folded bottoms helps lock the top flaps in place, giving the box its signature aesthetic. Once the top is pressed down, the box is structurally complete and ready to be filled.
Usage and Practical Applications
With the assembly complete, the box is now ready to serve its purpose. The interior space is surprisingly roomy relative to the compact exterior footprint. You can fill these boxes with a variety of contents depending on the occasion.
- Weddings and Anniversaries: Fill with personalized mints, small succulents, or jewelry pieces.
- Birthday Parties: Use as goody bag inserts for stickers, erasers, or mini snacks.
- Holidays: Perfect for holding Christmas ornaments, Easter candies, or Halloween treats.
- Corporate Events: Ideal for branding with company logos, containing USB drives, or promotional pens.
Closing the Box Securely
One of the most practical features of this design is its closure mechanism. After filling the box, you do not need additional tape or string to keep it shut. Simply press the two sides of the top downward again. The friction between the folded flaps and the internal structure keeps the lid securely in place. This is particularly useful for transport, as the contents will not spill out even if the box is turned upside down briefly. It also gives the finished product a neat, polished appearance without visible adhesive residues.
Common Misunderstandings and Tips
While the assembly is simple, beginners sometimes encounter issues due to common misconceptions. Here are a few tips to ensure success:
- Don't Skip Scoring: Many users try to fold directly without pressing the perforated lines first. This leads to crooked folds and a lopsided box. Always score first.
- Use the Right Glue: Liquid glue can warp thin paper. Consider using a glue stick or double-sided tape for cleaner, faster adhesion.
- Patience with Drying: Allow the glued tabs to dry completely before handling the box further. Rushing this step can cause the sides to pop open.
Conclusion
The 3D Bow Tie Shaped Party Favor Paper Box is more than just a container; it is a testament to the joy of making things by hand. Its design balances aesthetic appeal with functional simplicity, allowing individuals to create high-quality packaging without specialized tools or extensive experience. By understanding the principles of scaling, scoring, and folding, you can unlock a new level of creativity in your gift-giving and organizational habits. Whether used for a grand celebration or a small personal gesture, these boxes add a touch of elegance and thoughtfulness that is sure to be appreciated. Embrace the process, experiment with different paper textures and colors, and discover the satisfaction of bringing a flat design to life through your own hands.